
This root method works for almost all of Samsung Galaxy Note II devices. All credits go to Chainfire. Visit the original thread at XDA-Developer.
Step1: Download these files:
1- CF-Autoroot
(Depends on your model number which could be found in Setting-> About Phone)
- A) For N7100 Model go HERE.
- B) For N7105 Model go HERE.
- C) SHV-E250K Model go HERE.
- D) SHV-E250L Model go HERE.
- E) SHV-E250S Model go HERE.
- F) SPH-L900 Model go HERE.
- G) SGH-I317 Model go HERE.
- H) SGH-I317M Model go HERE.
If you didn’t see your model number above, don’t try using another model’s file because that might brick your phone.
2- Odin 3.07 From HERE.
3- Samsung USB Drivers from HERE and then install them.
Step2: Extract the CF-Autoroot until you got a file with .tar.md5
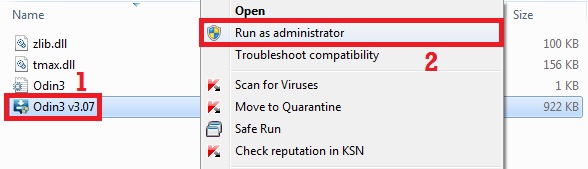
Step3: Extract odin307.zip then run Odin3 v3.07 as administrator.

Step4: Shutdown
your Note 2 completely. Then, hold down the volume down button+ the
home button then press the power button for 5 seconds, after you will
see a warning screen just press volume up.
Step5: Now click on “PDA” and choose the .tar.md5 file we downloaded earlier. Then connect the USB cable to your computer then to your Galaxy Note 2. Now Click on “Start”.

Step6: The phone will auto-start once the root is finished.
Note: To check whether your phone was successfully root or not, find the 'SuperSU' icon in your phone.

Step7: Your phone is now rooted. Congratulation! XD
Tested device: Samsung Galaxy Note II N7100
Android version : 4.1.2 (JellyBean)
Kredit to howtoteachers


0 comments:
Post a Comment